Playwrightで自動スクリーンショット取得
自動テストについて調べてみたなかで手始めに「Playwright」を触ってみることに。
まずは簡単なところから、URLのリストをもとにスクリーンショットを取得する処理を試しました。
やりたいこと
- 複数のURLに対して、順番にアクセスしながらスクリーンショットを取得
- URLリストはJSONファイルで管理
番外
- Basic認証がある場合も対応
- 特定の要素を非表示にしてからキャプチャを取得
- モバイルサイズ・PCサイズなど、デバイスごとにサイズ指定
- JPEGで保存する場合は画質を調整
npm init -y
npm install -D @playwright/test
npx playwright install
tests/screenshot.spec.ts
import { test } from "@playwright/test";
import fs from "fs";

const urls: string[] = JSON.parse(fs.readFileSync("./pages.json", "utf-8"));

for (const url of urls) {
  test(`screenshot for ${url}`, async ({ page }) => {
    await page.setViewportSize({
      width: 1280,
      height: 800,
    });
    await page.goto(url, { waitUntil: "networkidle" });

    // 特定の要素を非表示にする
    await page.locator(".クラス名").evaluateAll((els) => {
      els.forEach((el) => (el.style.display = "none"));
    });

    const u = new URL(url);

    // パス末尾の / を削除し、先頭の / を除き、/ を _ に変換
    const cleanPath = u.pathname
      .replace(/\/$/, "")
      .slice(1)
      .replace(/\//g, "_");

    // ホスト名(localhost や example.com)とパスを組み合わせてファイル名を生成
    const pathname = `${u.hostname}${cleanPath ? `_${cleanPath}` : ""}`;

    // 最終的なファイル名(screenshots/example.com_about_team.jpg など)
    const filename = `screenshots/${pathname}.jpg`;

    // 保存先ディレクトリ作成
    fs.mkdirSync("screenshots", { recursive: true });

    // スクリーンショット取得
    await page.screenshot({ path: filename, fullPage: true, quality: 80 });
  });
}
pages.json
[
  "ページURL1",
  "ページURL2",
  "ページURL3"
]
実行して取得したスクリーンショット
Chrome拡張機能などで取得したスクリーンショットほどスッキリ・クリアな感じの画像ではないけど、確認程度なら十分な画質。
qualityを100にしても変わらずでした。
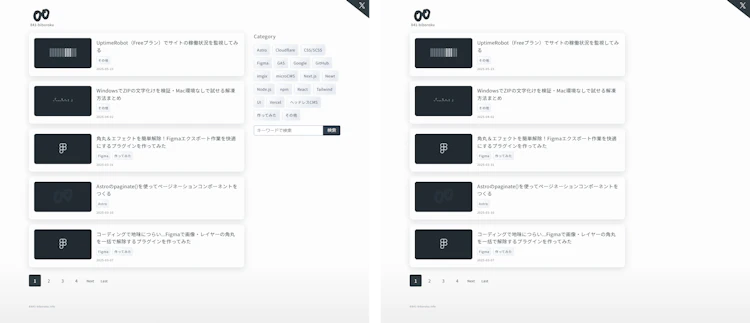
特定の要素を非表示にする
await page.locator(".クラス名").evaluateAll((els) => {
  els.forEach((el) => (el.style.display = "none"));
});クラス名を指定してdisplay:noneにしています。
↓は、左側がもとの状態で右側がクラス名を指定してサイドバーを非表示にして取得したスクショです。
Basic認証を事前設定する
httpCredentialsを指定するだけなので簡単に設定できます。
playwright.config.ts
const config = {
  use: {
    trace: 'on-first-retry',
    httpCredentials: {
      username: 'Basic認証ユーザ名',
      password: 'Basic認証パスワード',
    },
  },
};
export default config;
今後やりたいこと
今回は静的なページを対象にしたスクショ取得を試しましたが、次はフォームのテストや動的操作の自動化も試してみたいと思っています。
Playwright、おもしろい。